2. Add a new form
To add a new form click on add new form link on dashboard menu. It will open Optin Builder page where optin forms can be created.

Enter the name of this campaign and click on next button to continue to next step.
3. Optin Types & Templates
PluginOps Optin Builder comes with pre designed templates and multiple optin types. You can create inline forms, popups, bars, Slide ins , & full page optins. All these are tested to improve the conversion rate and are always being updated to latest designs.
Most templates are premium so If you want to save your time and not design these yourself I highly recommend to get the premium extension package.
Click on the optin type you want to create and then click on next button to select a template, each optin type have its own set of templates.

The templates page will display the templates of selected optin type. Whether you need a PopUp, Inline, fly in, full page or bar all the templates are here to be used with just one click.

To use a template click on the Select button below a template and then click on next button It will open the selected template in editor so you can make required changes.
4. Editing A Template
PluginOps Optin Builder is highly customizable unlike other optin plugins where you can only replace text and change colors PluginOps Optin Builder let users do everything with drag and drop responsive builder which also works on phones.

Each element is customizable and have its own set of options not just basic options it also offers responsive options which are just amazing when your are designing for multiple screen sizes.
PluginOps Optin Builder has divided templates into three parts.
- Rows / Sections
- Columns
- Widgets

1. Rows
The row is container for columns and widgets, a row can have upto 8 columns. You can also set a background color, background image, or background video for rows.
Rows columns and widgets have options to set paddings and margins.

2. Columns
Columns similar to rows have options like background image, color, margin & padding addition to that it also have box shadow option to give shadow effect.

3. Widgets
Each widget will have its own set of options which depends on the type of widget.

The advanced options tab on widget editing panel gives users access to options like margins, paddings, background option and much more.
5. Add New Widget
To add a new widget click on blue edit button for column or open the left options panel. Then click on new widget tab.

On this tab you will find a list of available widget click and drag a widget onto a column to place it there.
Additionally if you want to change its position you can do so by changing margins & paddings for that widget.
6. Placement
PluginOps Optin Builder has a powerful shortcode generator with all the options you need to create a smart optin.
To place optin simply copy the generated shortcode and paste in posts/pages content or if you want to display across whole website place shortcode in a widget of your themes sidebar.
(Some themes do not support shortcodes in widgets, to fix that you can install free plugin called Shortcode Widget from WP Plugin Directory)

With shortcode generator select the Optin Type.
1. Inline Optin
Inline optin are the forms or optins you can place in your content or sidebars. Inline forms will only be displayed where you place the shortcode.
2. PopUp Optin
PopUp optins are overlays that cover the full page with form in middle of the page.
3. FlyIn Optin
FlyIn popups are small boxes that pop out from below the page and cover only fraction of screen. These are less annoyings optins and google recommend these and discourage to use full page popups.
FlyIns can be placed at bottom right, bottom center or bottom left of the page.
4. Bars Optin
Bars are also less intrusive type of popups, Bars are smaller in height and pop from bottom or top of the page covering only little space of page.
5. Full Page
Full Page optins covers the full screen of user making without any transparency.
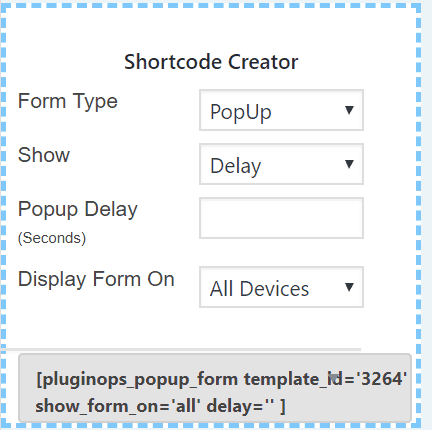
All Optins can be triggered on user actions like On click, On Scroll or On exit. To enable a trigger select a trigger type from dropdown menu and then enter the value for it in the field below.
You can also make the optin visible only on specific device type in case if you want different designs for visitors on different devices. This feature is highly useful because of recent changes in google search algorithm which cause deranking of pages which use popups on mobile devices.